fd로 파일을 좀 더 빠르게 찾아보자
목차
- 개요
- 설치
-
사용법
-
예제
fd <name>fd <name> <path>-
옵션 설명
-d (--max-depth) <depth>: 최대 탐색 깊이를 지정한다.-t (--type) <type>: 파일 타입을 지정한다.-g (--glob) <glob>: 특정 검색 패턴과 정확히 일치해야만 출력된다.-p (--full-path): 전체 경로가 일치하는 조건의 파일을 출력한다.-e (--extension) <ext>: 확장자가 일치하는 조건의 파일을 출력한다.-H (--hidden): 숨김 파일을 포함하여 검색한다.-I (--no-ignore): 숨김 디렉토리 내 파일도 검색한다.--follow: 심볼릭 링크를 따라가서 검색한다.--change-newer-than, --change--older-than: 변경 시간으로 찾기
-
예제
- 사용법
- 응용
개요
Ubuntu에서 fd를 설치하고 사용해보자.
설치
공식 문서의 설치 방법 : https://github.com/sharkdp/fd#installation
해당 명령어로 설치하면 되는데… 나는 없네.
알고보니 Ubuntu 18.04는 apt로 fd 패키지를 설치할 수 없었다.
1

apt-get install fd-find
1
2
3
4

Reading package lists... Done
Building dependency tree
Reading state information... Done
E: Unable to locate package fd-find
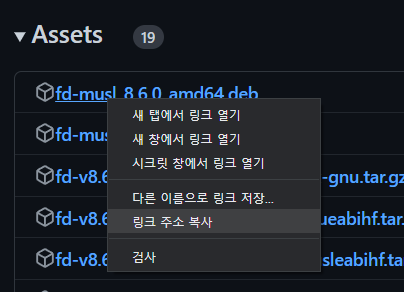
어쩔 수 없이 https://github.com/sharkdp/fd/releases fd 릴리스 페이지에서 deb 패키지를 받아
아래 방식으로 설치하기로 했다.
1

dpkg -i <package name>.deb
링크 주소를 복사해서 터미널로 wget 명령어로 받아 dpkg 실행하는 게 더 빠르다.
1
2

wget --no-check-certificate https://github.com/sharkdp/fd/releases/download/<fd install deb>
dpkg -i <fd install deb>
사용법
1

fd <옵션> <file> <찾을 경로>
예제
fd <name>
현재 경로에서 하위 디렉토리 내 해당 이름이 포함된 파일 또는 디렉토리를 찾아 보여준다.
1
2
3
4
5
6
7
8

fd test.txt

filetemp/testsrc/test.txt
filetemp/util/pcre/pcre/pcre-8.42/doc/pcretest.txt
filetemp/util/sample/dbtest.txt
test.txt
/SSL_QAT_SRC/openssl-1.1.1q/engines/e_ossltest.txt
/share/doc/pcre/pcretest.txt
fd <name> <path>
path 경로에서 하위 디렉토리 내 해당 이름이 포함된 파일 또는 디렉토리를 찾아 보여준다.
1
2
3
4

fd fd.md iblea.github.io

iblea.github.io/wiki/linux/fd.md
iblea.github.io/wiki/linux/mdresources/dir_fd.md_img/
옵션 설명
공식 문서 의 옵션 설명 내용이다.
1
2
3
4
5
6
7
8
9
10
11
12
13
14
15
16
17
18
19
20
21
22
23
24

  -H, --hidden                     Search hidden files and directories
  -I, --no-ignore                  Do not respect .(git|fd)ignore files
  -s, --case-sensitive             Case-sensitive search (default: smart case)
  -i, --ignore-case                Case-insensitive search (default: smart case)
  -g, --glob                       Glob-based search (default: regular expression)
  -a, --absolute-path              Show absolute instead of relative paths
  -l, --list-details               Use a long listing format with file metadata
  -L, --follow                     Follow symbolic links
  -p, --full-path                  Search full abs. path (default: filename only)
  -d, --max-depth <depth>          Set maximum search depth (default: none)
  -E, --exclude <pattern>          Exclude entries that match the given glob pattern
  -t, --type <filetype>            Filter by type: file (f), directory (d), symlink (l),
                                   executable (x), empty (e), socket (s), pipe (p)
  -e, --extension <ext>            Filter by file extension
  -S, --size <size>                Limit results based on the size of files
      --changed-within <date|dur>  Filter by file modification time (newer than)
      --changed-before <date|dur>  Filter by file modification time (older than)
  -o, --owner <user:group>         Filter by owning user and/or group
  -x, --exec <cmd>...              Execute a command for each search result
  -X, --exec-batch <cmd>...        Execute a command with all search results at once
  -c, --color <when>               When to use colors [default: auto] [possible values: auto,
                                   always, never]
  -h, --help                       Print help information (use `--help` for more detail)
  -V, --version                    Print version information
-d (--max-depth) <depth> : 최대 탐색 깊이를 지정한다.
예제
1
2
3

fd -d 1 test.txt

test.txt
1
2
3
4

fd -d 2 test.txt

test.txt
ttt/test.txt
-t (--type) <type> : 파일 타입을 지정한다.
(find 명령어와 동일하다)
파일 타입으로는 file (f), directory (d), symlink (l), executable (x), empty (e), socket (s), pipe (p) 가 있다.
예제
1
2
3
4

fd plugin -t d
filetemp/jmeter/docs/api/org/apache/jmeter/gui/plugin/
filetemp/jmeter/docs/api/org/apache/jmeter/plugin/
nginx/contrib/vim/ftplugin/
-g (--glob) <glob> : 특정 검색 패턴과 정확히 일치해야만 출력된다.
glob 패턴을 지정한다.
예제
옵션 없이 test.txt 를 찾자 pcretest.txt 와 같이 test.txt 파일을 포함하는 파일도 검색되었다.
1
2
3

fd test.txt
filetemp/health_check_ncp/test.txt
filetemp/util/pcre/pcre/pcre-8.42/doc/pcretest.txt
-g 옵션을 붙이면 test.txt 파일만 검색된다.
1
2

fd -g test.txt
filetemp/health_check_ncp/test.txt
-p (--full-path) : 전체 경로가 일치하는 조건의 파일을 출력한다.
-g 옵션과 사용하여 glob 전체 경로로 검색할 수 있다.
예제
fd -p <정규식> 으로 검색
1
2
3
4
5
6

fd -p 'filetemp/.*\.tgz'

filetemp/test.tgz
filetemp/util/util.tgz
filetemp/util/uss/tmp.tgz
filetemp/util/uss/uss.tgz
fd -pg <glob 패턴> 으로 검색
1
2
3
4
5
6

fd -pg '**/filetemp/**/*.tgz'

filetemp/test.tgz
filetemp/util/util.tgz
filetemp/util/uss/tmp.tgz
filetemp/util/uss/uss.tgz
-e (--extension) <ext> : 확장자가 일치하는 조건의 파일을 출력한다.
title
1
2
3
4
5

fd -e css -e scss . public

public/css/copyblock.css
public/css/main.scss
public/css/main_dark.scss
-H (--hidden) : 숨김 파일을 포함하여 검색한다.
title
일반적으로는 숨김 파일은 검색하지 않는다. \ 따라서 fd -d 1 .vim 시 검색 결과를 찾을 수 없다. \ 이때 -H 옵션을 붙이면 찾을 수 있다.
1
2
3
4
5

fd -H -d 1 .vim

.vim/
.viminfo
.vimrc
-I (--no-ignore) : 숨김 디렉토리 내 파일도 검색한다.
--follow : 심볼릭 링크를 따라가서 검색한다.
--change-newer-than, --change--older-than : 변경 시간으로 찾기
-
--change-newer-than을 사용하면 변경일/특정일 이후 파일을 찾을 수 있다. -
--change-older-than을 사용하면 변경일/특정일 이전 파일을 찾을 수 있다.
예제
-
fd --change-newer-than 1days -l- 1일 이내 변경된 파일을 찾는다. (하루 이내에 수정된 파일)
-
fd . --change-newer-than '2023-01-01 00:00:00' -l /home/test- 2023년 1월 1일 00시 00분 00초 이후 변경된 파일을 찾는다. (2023년 이후로 수정된 파일 찾기)
-
fd --change-older-than 1days -l- 하루 이전에 변경된 파일을 찾는다. (하루동안 또는 그이상 수정되지 않은 파일)
-
fd . --change-older-than '2023-01-01 00:00:00' -l /home/test- 2023년 1월 1일 00시 00분 00초 이전 변경된 파일을 찾는다. (2023년 이후 변경된 내역이 없는 파일 찾기)
이외에도 많은 옵션을 지원하니 자세한 내용은 공식 문서를 참고하자.
사용법
-m 옵션 사용 시 여러 파일을 선택할 수 있다.
-
ctrl+korctrl+p: 위로 이동 \ ctrl+jorctrl+n: 아래로 이동-
enter: 선택
다중 파일 선택 기능 사용 시
-
tab: 파일 선택 -
shift+tab: 파일 선택 해제 -
enter: 선택된 파일로 끝내기
응용
절대경로 출력하기
1
2
3
4
5

# readlink -e $(fd -HI prefix)
# fd -HI prefix | xargs -I {} readlink -e {}
fd -HI prefix | xargs readlink -e

/home/test/iblea.github.io/wiki/algorithm/prefix-sum.md
vi로 열기
1

vi $(fd -HI prefix)
remote-ssh의 경우 code로 열기
1
2

code $(fd -HI prefix)
fd -HI prefix | xargs code
